Tag Archives: pep ventosa technique

What I Have Learned: “In The Round Images”

It is interesting to look back at your portfolio and experience the journey. I recently had that experience while publishing  a gallery of my favourite in the round images.

Photo impressionism has been a big part of my photographic vision for a long time now. However, exposure to Pep Ventosa’s “in the round” work in 2012 turned my photo impressionism paradigm on its head. Up to that point I had been working with images moving in the frame using slow shutter or multiple exposure techniques. It had never occurred to me that the frame might move too. Moving the frame around the subject is the essence of in the round photography.

One of my favourite photo impressionistic images. A beach umbrella in St. Lucia photographed using the in the round montage technique. © Stephen D'Agostino.
One of my favourite photo impressionistic images. A beach umbrella in St. Lucia photographed using the in the round montage technique. © Stephen D’Agostino.

In the Round  Technique

The beach umbrella above is composed of about 30 images methodically taken around it. My camera is handheld with the relative location of the point of interest maintained in the viewfinder. The images are then brought together using an opacity blend. In my workflow I start in Lightroom.  I open all the images at once, as layers, and then start the process of opacity blending.

The video above gives a sense of the process I used to create the beach umbrella. What I find interesting is how details fall away leaving blocks of colour and a generalized impression of the subject.

The fountain, Washington Square New York © Stephen D'Agostino
The fountain, Washington Square New York photographed “in the round” . I like the way this image captures  the energy  of  of a busy afternoon at Washington Square. © Stephen D’Agostino

Two important decisions play a big part in the creation of a successful in the round image.

The first is the subject; the basic shape has to be interesting enough to withstand being deconstructed. Opacity blending creates what is really an average of the shape from many points of view. I think of the process as “image averaging.”

The second decision is how you treat opacity blending. By that I mean the opacity mode and/or the amount of opacity of the various layers. In the Washington Square image I wanted to compress the activity around the fountain to capture the excitement of place. The beach umbrella was more of an exercise in shape and colour.

A tree in Fall colours photographed "in the round" © Stephen D'Agostino
A tree in Fall colours photographed “in the round” . Lakeshore Boulevard, Toronto © Stephen D’Agostino

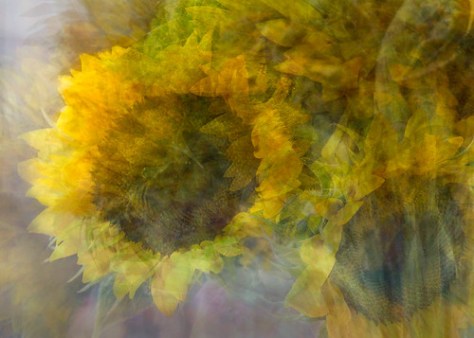
It was Pep Ventosa’s trees that originally caught my imagination. Having worked with trees as a subject I think I understand why. For me trees symbolize the strength and vitality of the natural world.  Image averaging seems to emphasize those qualities.  Tree trunks seem to reach higher. The branches and crown are fuller and rounder.

The resulting textures are interesting too. By layering  the leaves the viewer is left with the impression of a pointillist painting in a landscape reduced to basic shapes and colours.

A planter of flowers photographed "in the round" © Stephen D'Agostino
A planter of flowers photographed “in the round” © Stephen D’Agostino

In The Round – Photo Impressionism Tools

This is a technique that is not camera dependant. I have had good luck using a DSLR, mirrorless camera and an iphone. The key is being able to hold a relative point in the viewfinder; grid lines really help.

Post production is the key. I open the images as layers in Photoshop and then start to blend the opacity. If you are blending manually start by reducing opacity by 50% of the preceding image until you get to about 5%; experiment from there. The process is very processor intensive and file sizes are huge so be prepared to wait.

I also use a couple of plugins to automate the process where appropriate:

  • Layer Stack Opacity Blending: a script that evenly blends opacity in a way that mimics in camera multiple exposure. Thanks to Digital Outback Photo for maintaining the script. I often use this script to test an image idea before manually setting the opacity.
  • Dr Brown’s Stack-A-Matic: a good alternative to opening images as layers in Photoshop. Dr Browns site is worth exploring. There is a wealth of information on photoshop technique. Or check out Dr. Russell Brown Services on Adobe Exchange.


It’s in the detail

“In the round” has been a focus of my recent photo impressionist work. I have experimented with outdoor subjects such as trees, fountains, even carousels. Subjects that have a symmetrical shape seem to work best because the technique deconstructs the subject  by averaging the pixels in the underlying photographs and isolates it in the context of a textured background that hints at the subject’s context. The images tend to be painterly; sometimes surreal; always interesting. I’m hooked, but on a rainy day, what to do but try some still life.

The sunflower image above is composed of about 40 photographs. I spent considerable time reordering the base images ( Photoshop layers) in order to produce the impressionistic effect. I like the feel here. The detail in the flowers produces a lot of visual interest. The vase also generalized well. But the stems seem too thin and a bit out of balance for my liking.

When I come to print this one. I think I might try cropping it in portrait format to better balance the flowers, vase and stems.

sunflowerdsc2390etal_detail-1.jpg

That’s when it struck me. The strength of this image may be in its parts rather than the whole.

Finding the picture in the picture (sometimes called image harvesting) isn’t new. Think about it. When you look through the viewfinder you are selectively cropping the image. Why not do the same thing post production? Provided the original shot has enough pixels to allow for it, selective cropping gives you another opportunity to produce your vision.

Once you have selected the cropped image, consider going back and rebalancing the post production adjustments to strengthen the image. Think of using a zone approach where the textured whites draw your eye and the blacks give it rest.

sunflowerdsc2390etal_detail3.jpg

I really like Detail 2. Visually it takes me back to my first multiple exposure impressionistic images. However, because the images were shot in the round, the underlying pattern is much more interesting. And it has been well received. The image was featured on Flickr’s explore page. At the time of writing  Sunflowers In The Round: Detail 2 had about 7,000 views on Flickr.

Instagram


Merry Christmas

This image of the Swarovski Christmas Tree was taken at the Yorkdale Shopping Centre in Toronto. 32 images were taken all around the tree then merged together using Tony Sweet’s Layer Stack Opacity Blending script. The resulting image was colour corrected then given a bit of structure using NIK’s tonal contrast filter.

Evergreen trees are a perfect subject for “in-the-round” photography and the christmas tree is the perfect evergreen. I think it is the symmetry that makes it such a good subject. And the strong personal connection to Christmas makes the image more compelling.

I have been shooting “in the round” for about 2 years now and have developed a few personal approaches to the subject. Of course photo Impressionism is meant to be creativity without boundaries or rules but I think you need a bit of craft to make this technique work. Here are some thoughts:

– the subject needs an axis. It doesn’t have to be symmetrical but you have to visualize it spinning like a top and if that visualization works you have something.

– the more you accomplish in camera, the less contrived the result will appear. In the round is inherently messy and the photographer must bring order to the chaos. I accomplish this by careful framing the subject using the grid lines in my view finder. It seems to work best for me if the camera is handheld but the subject (the axis) is carefully maintained between the bottom top grid lines so that its size and location in the frame is constant.

– because the final image is composed of a large number photographs, individual elements tend to dissolve into a textured background unless they are repeated. For example, people walking through your shot tend to disappear while people standing tend to remain a compositional element.

– shoot lots- then shoot some more. I think the technique needs about 30 images minimum to work properly. I try to maintain the same distance from the axis element of the image and use a zoom to fine tune the size of the main subject.

– post production – I start in Lightroom where I select the images I intend to use and then open them in Photoshop as layers.

– once in photoshop you can use a tool such as Tony Sweet’s layer stack opacity script or for more control start with the bottom layer and manually decrease the opacity of each layer above by about 50% ( eg 100 50 25 13 6% opacity) until you get to about 6%. Play with the image order and opacity until you achieve your vision. Resist the urge to fix alignment issues in photoshop.

– the resulting image is going to look a bit washed out so I generally add a bit of life back using a white/black point colour correction, contrast, and NIK’s tonal contrast filter.

Photo-Impressionism: Other Voices

dagostino01 by Stephen D'Agostino
dagostino01, a photo by Stephen D’Agostino on Flickr.

Via Flickr:
Watching Mona Lisa – Paris – in camera multiple exposure. This image, printed on stretched canvas, was exhibited at Toronto’s 2007 Contact Festival. See more at www.dagostino.ca/Contact/contact_index.html

First and foremost the goal of my website project is to promote the idea of photo impressionism as a genre in the hope that others will embrace it.

When I first started to create photo impressionistic images in the mid nineties there were only a few photographers exploring it on the web and fewer in print. Freeman Patterson’s book Photo Impressionism and the Subjective Image published in 2001 was a powerful resource and really changed the way I visualized photography ; really an extreme extension of the unbridled call for creativity in his 1999 book Photography for the Joy of It. Since then, and in no small part thanks to the digital revolution, photo impressionistic images have joined the main stream (if evidence is needed, look no farther than the plethora of multiple exposure and slow shutter images coming out of the Olympics.)

However, straight photography has been so prevalent for so long that photo impressionistic images still are not well received. Interestingly photographers seem most reluctant to embrace it. The comments appearing in dpreview.com’s coverage of Reuters’ Olympic multiple exposures illustrates point. It is shocking to see photographers loose site of the fact that every image is a”mere”representation of the event, not a true reproduction. Photo Impressionism is no different. Using photography as the medium it tries to capture the essence of a moment or thing and convey that essence to the viewer.

Here is a selection of photographers who seem to have embraced photo impressionistic techniques. I don’t mean for this list to be exclusive or exhaustive so by all means contact me if you would like to be included:

Pep Ventosa

Lovely photo impressionistic images “in the the round”:
http://www.pepventosa.com

Eva Polak

Lots of experimentation resulting in some great images. Check out her abstracts:
http://www.evapolak.com/

Dave Wodchris

Check out his use of slow shutter technique which produce some lovely abstracts:
http://www.davewodchis.com

Susan Thomson

Interesting hand coloured sx70 prints. I like the creative use of this old school technology to produce a photo impressionistic look:
http://www.sx70.com

Nikhil Bahl

Sun Flowers using slow shutter pan and zoom. Reminiscent of Van Gogh:
http://nikhilbahl.blogspot.ca/2010/07/photo-impressionism-zoom-flick.html

Flickr

There is a lot of great talent showcasing on Flickr. Check out the photo Impressionism groups:

Fire storm

Photo Impressionism – In The Round

Walking past the Lumas Gallery in Soho I was reminded that travel photography isn’t just about taking pictures. It is also an opportunity to see new ideas and techniques.

A few months ago I saw an exhibition of multiple exposure photographs shot “in the round” at Lumas. The photographer, Pep Ventosa, took photographs of trees from very angle and then merged them together to create a montage. The images, and in particular the trees, are beautiful, painterly and impressionistic. You get a sense of the tree, it’s environment, and more.

The technique is more difficult than it sounds. I use a DSLR that allows for in camera multiple exposures but the camera times out before you are finished and it doesn’t allow you to shoot enough images. I don’t think the technique works with fewer than 20. So you are forced to shoot single images and then merge them in Photoshop. I find that if you frame your shots as if the image in an in camera multiple exposure, the post processing won’t be as contrived because you maintain the sense of random error inherent in that kind of photography.

I have been experimenting with in-the-round using strong vertical subjects such as fountains, carousels and monuments. There is much to learn here but I think the Washington Monument example shows promise.

More to come on this technique as I figure out what works and what doesn’t.