I have been reprocessing some older multiple exposure montages using new techniques.
This is one was shot in October 2019 during the Toronto Waterfront Marathon using my iPhone’s burst mode and can be found on Rarible as an NFT.
Front Running Marathoners – a multiple exposure montage
The technique is pretty simple:
Shoot trying to visualize your point of interest with enough room for cropping.
Load into Photoshop as layers. I use Lightroom for this;
To create the multiple exposure effect you have to change the opacity. Start with the base layer at 100% and ever layer after that reduced by about 50% until you get to around 5%. Once you have a sense of the resulting image play with the opacity until you are happy with the resulting impressionistic image.
Colour correct. I think setting your black point and white point is most important as there are colour shifts. I also use NIK’s tools.
Here is a short video to give you an idea of that I do. Feel free to reach out on instagram/sjdagostino_photoimpressionism
I am proud to say that Daylighted has chosen to feature my photo impressionistic work at its space in the Sofitel Redwood City as part of a great group exhibition and has selected me as June’s featured artist.
Stephen D’Agostino’s photo impressionism is featured at Solitel Redwood City.
By using new technology, Daylighted transforms places such as hotels and restaurants into digital art galleries and offers them an opportunity to easily display and sell an exclusive collection of art from worldwide and local artists.
I like the idea of bringing digital art to a wider audience using display technology. It is an extension of what we know and see on our many devices and as a result is not unexpected. It also has the advantage of size. In the case of my images, I think size does matter. More importantly I like the idea of exposure to an audience that is engaged in the experience of place and life rather than the internet; make no mistake, art is meant to be experienced not consumed.
Thanks to the Daylighted team for championing photo impressionism.
Eugephemisms is a blog about fitness, life and less visited places. It has a special focus on dragon boat racing, A recent post featured 10 of my photo impressionistic dragon boat images and I think it is worth a look.
Here is an extract:
Why do you shoot impressionistic images of dragon boats? Stephen:Because photographs just capture a split second they often miss the moment we experienced. I think that is particularly true with dragon boat racing. Dragon boat racers exude grace/power/energy and I think I capture that better using photo impressionistic techniques.
How do you create your images? Stephen:I use 3 techniques which effectively compress a moment in time into a single image. I started using in camera multiple exposures which is an old school technique. Recently I have been merging high speed bursts of 20 or more images. These techniques really emphasize movement and power. As well I love the graceful results you see in long exposures; often in the range of 0.6 to 1.5 seconds.
This is a fabulous time to be a photographer. There have never been better tools to realize your vision. There have never been better opportunities to share it with the world. In keeping with that my early impression of the N 1 V3 is that it is a significant advancement and has become my go to – everyday camera and an important tool in my photo impressionism projects.
if its true that the best camera is the one in your hand, it may be time to think about switching hands.
To put my viewpoint in perspective I have been a Nikon DSLR guy since the beginning (with a short Fujifilm S Pro dalliance). Starting with a F2 film camera I liked the ability to make manual decisions but grew to love the freedom autofocus and auto-exposure provided when time was of the essence. Big bright lenses were a staple in my bag which of course rivaled a small child in weight. I bought a D4 loved it and then developed sciatica and the photographic world ended. I couldn’t carry my kit.
The small mirrorless camera is not a new idea. The micro 2/3rds format has been with us for a while and Fujifilm, an early adopter, has produced some great mirrorless cameras. My introduction was the N1 J2 which proved to be a great travel camera (see my thoughts here). What I longed for was a Nikon camera to leverage my lens investment, a viewfinder to help composition on sunny days and good balance between size and holdability. The N1 V3 doesn’t disappoint.
Right out of the box I knew I had something special. The camera is just big enough to fit in my hand. It feels well constructed. Add the grip and it feels sturdy. The controls are where a Nikon user would expect them; including the thumb wheel control dials. I added a long wrist strap from gordyscamerastraps.com.
Photographed with the Nikon N 1 V3. A fast shutter and viewfinder allowed this series of images to be stacked one on the other to create this impressionistic effect of a dragon boat,
I find I always have the grip attached. I think there are a couple of reasons for that. 1st it adds a secondary control dial which I seem to use a lot. More important, the grip does just that; it gives the camera a solid feel in my hand.
The camera, two N1 lenses, batteries and the usual stuff fits nicely into Think Tanks smallest Turnstyle Sling Bag with room to spare for a phone and wallet. Portability – check.
Photographed with the Nikon N 1 V3. 20 images shot at 30 fps and then brought together with an opacity blend, I couldn’t have achieved this with the Nikon D4.
The viewfinder is an attachment. It goes on and comes off easy enough and provides a nice bright point of view. You can set it for both grid lines and an artificial horizon which is a big help to me in image placement and composition. What I really like is that it adjusts image brightness in real time; meaning dark scenes are easier to compose because they appear as brighter previews based on your exposure settings.
The back mounted LCD screen is nice and bright. I like the way the LCD articulates which allows for better composition when the subject requires an awkward point of view without feeling delicate.
The kit 10 – 30 mm pancake lens has a really low profile and auto lens cap feature. No complaints about quality but I miss the barrel mounted “on/off” button of the other N1 lens I own. I now have to remember which lens is on the camera and what has to be done to start shooting. Not a great quality when you are in a hurry. I also miss having a filter thread. I use a variable neutral density filter a lot. As a result my 30-110 mm N 1 lens seems to be a permanent fixture.
My impression of image quality is quite good. I only see grain at the top end of the ISO range. Nothing that can’t be addressed post production. At 160 ISO there is great colour fidelity and faithful tonal reproduction. In other words rich and true.
My Special Considerations
Photo Impressionism is my passion. For the N1 V3 to work for me it has to give me the options I relied on the D4 for. For the most part it does.
From a sensor size point of view the N1 V3 has about 2 million pixels over the D4. That is important for me because I often work with “the picture in the picture”.
The camera is really fast. Blindingly fast actually. After moving to Lexar’s fastest micro sd card the camera will sustain long bursts of raw images at 30 fps without choking. Slower cards give you slower performance. This new speed allows me to time stack moving subjects in a way I can’t with the D4’s 11 fps. Based on my early experiments I think these long fast bursts are going to become an important tool for me.
At the other end of the shutter range I found that setting a low ISO (160 is the lowest) stopping down with a variable neutral density filter and shooting in shutter priority provides a good slow shutter result. For my slow shutter work I would have prefered a lower ISO. On the other hand 12,800 ISO creates some great “natural light” opportunities at night.
I was surprised to discover there is no multiple exposure mode. I have relied on in camera multiple exposures since my earliest impressionistic images so this was a setback. My understanding is that in camera multiple exposure is software driven so I am hoping a future release will solve this obvious failing.
A couple of complaints
No camera is perfect. This one is no exception. Here is my list of issues I would love to see Nikon address.
– multiple exposure mode – I’m not sure why a camera as feature rich as this does not support up to 10 frames in camera multiple exposure. Given the popularity of photo impressionism I would have thought that would be a given.
– battery port – you have to remove the grip to change batteries. WTF!
– viewfinder – I was disappointed to read that Nikon recommends you take the viewfinder off when travelling to avoid damage. In bright conditions that really slows down spontaneous shooting. As well, the viewfinder is just the mirrored LCD view. That means the viewfinder can go blank when the camera is processing or shooting can be interrupted when previews are posted. That matters when you are tracking a fast moving dragon boat. I would have preferred an always on live view option.
– micro sd – I am looking at my collection of fast cf, sd and xqd cards. I really don’t want the complexity of carrying around yet another media type. Besides, a micro sd is hard to keep track of out of the camera on big shooting days.
– colour space – Being able to choose your colour space is awesome. But the choice is limited to Adobe RGB and sRGB. The sensor is good enough to support Pro Photo, Nikon should too.
At the risk of being labelled a Nikon Fan boy I have to say I love this camera. The N 1 V3 more than makes up for its few failings with speed and portability. Nikon users will immediately find the controls intuitive. It has the tool set I need for my passion absent in camera multiple exposure mode.
From my point of view; if its true that the best camera is the one in your hand, it may be time to think about switching hands.
I often forget how important it is to look back at your portfolio to see where you have been. I was reminded of that while rounding out my website with a new multiple exposure gallery. Photography is so focussed on the moment that it is easy to miss the lessons of time.
The first observation is how easy it is to get into a rut. Lately I seem to be focussed on in the round images. The result of that effort has been some great images but I have lost some of the spontaneity I liked in my earlier work. This is going to be a long term struggle; spontaneity vs pre-visualization.
Second, I seem to have a better understanding of the genre now. Impressionism requires a fine balance between the representational and the abstract to successfully create movement. The mind needs a familiar shape to draw the eye. The eye needs movement to maintain its interest. I am wondering if there is a new rule of composition here? “Successful images draw you from the recognizable to the abstract?”
Third, multiple exposure seems to deconstruct subjects into blocks or alternatively, does the opposite creating a pointillist effect. The images I like best are driven by colour. Big bold blocks of colour. It doesn’t matter if the subject is soft such as “The Gallery of Light” or more structured like “Art Market”, colour competes with form for your eye’s attention.
Last, I am reminded of the paradigm of photo impressionism. In traditional photography the subject is framed by the camera. In multiple exposure photography the image is created by the movement of the frame.
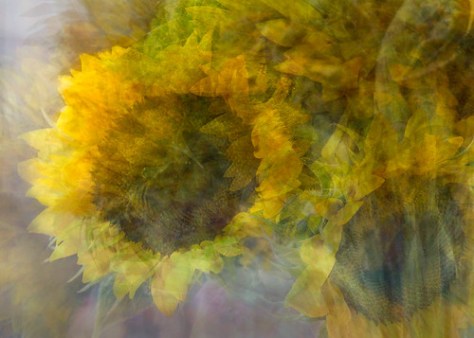
“In the round” has been a focus of my recent photo impressionist work. I have experimented with outdoor subjects such as trees, fountains, even carousels. Subjects that have a symmetrical shape seem to work best because the technique deconstructs the subject by averaging the pixels in the underlying photographs and isolates it in the context of a textured background that hints at the subject’s context. The images tend to be painterly; sometimes surreal; always interesting. I’m hooked, but on a rainy day, what to do but try some still life.
The sunflower image above is composed of about 40 photographs. I spent considerable time reordering the base images ( Photoshop layers) in order to produce the impressionistic effect. I like the feel here. The detail in the flowers produces a lot of visual interest. The vase also generalized well. But the stems seem too thin and a bit out of balance for my liking.
When I come to print this one. I think I might try cropping it in portrait format to better balance the flowers, vase and stems.
That’s when it struck me. The strength of this image may be in its parts rather than the whole.
Finding the picture in the picture (sometimes called image harvesting) isn’t new. Think about it. When you look through the viewfinder you are selectively cropping the image. Why not do the same thing post production? Provided the original shot has enough pixels to allow for it, selective cropping gives you another opportunity to produce your vision.
Once you have selected the cropped image, consider going back and rebalancing the post production adjustments to strengthen the image. Think of using a zone approach where the textured whites draw your eye and the blacks give it rest.
I really like Detail 2. Visually it takes me back to my first multiple exposure impressionistic images. However, because the images were shot in the round, the underlying pattern is much more interesting. And it has been well received. The image was featured on Flickr’s explore page. At the time of writing Sunflowers In The Round: Detail 2 had about 7,000 views on Flickr.
The big technical challenge in producing photo impressionistic images as a montage (as opposed to an in camera multiple exposure) is working with large numbers of images and huge file sizes. Some of my recent experiments (Washington Square in the round for example) have used close to 40 images, resulting in file sizes over Apple’s 2 gig file limit.
Even in camera multiple exposures have issues. I find then to be inherently soft and, depending on the camera, suffer from from a red cast.
Here are a couple of tools I have found to be useful time savers:
Creating A Layer Stack In Photoshop
– Adobe Lightroom is my first choice to produce a layer stack in Photoshop because I already use it to manage my images. Select your images then right click for the menu choice.
– Dr Brown’s Stackomatic. A great script you launch from Adobe Bridge to create a layer stack.
Opacity Control
– Layer Stack Opacity Blending Script. A great script from Digital Outback Photography based on some thinking by Tony Sweet. The script calculates opacity and merges layers into a multiple exposure style image. There are no controls but the result is nice.
– Perfect Resize makes file sizing, in both directions, a snap. This is important for me because Adobe Lightroom is an important part of my workflow and it does not recognize files saved in large image format (.psb). Often my working files are much larger than Apple’s 2 gig file size limit.
Basic Digital Darkroom
In camera multiple exposures bring their own challenges. My fuji S2 adds a pronounced red shift which is significantly reduced in the S5. As well there is a softness associated with multiple exposures that may have to be addressed.
– Vincent Versace has produced some great actions (associated with his books and DVD courses) for correcting white/black point and mid tone contouring.
There are two big challenges from my point of view. First the images have to be carefully composed to allow them to be merged. I try to keep a constant distance from the subject and use my view finder’s grid lines to keep the composition consistent. It all makes sense if you think of making an in camera multiple exposure. While you can fix composition issues in Photoshop, the result may look too contrived.
On the Photoshop side, the images depend on the use of opacity and blending modes. I have had good results using 50% of the opacity of the layer below as a rule of thumb. Different blending modes produce very different results. I like the look of luminosity mode.
Via Flickr:
Washington Square, New York. Another in a series of experiments in this genre. This image is composed of about 40 photographs taken around the fountain and then merged in photoshop. Post production was limited to colour balancing and filters designed to bring back a bit of structure such as NIK’s tonal contrast filter and Vincent Versace’s mid tone contrast action.
I have been experimenting with action sports such as dragon dragon boat racing and distance running using multiple exposure photography. So you can imagine my pleasure seeing some great examples coming out of the olympics.
These are some of the images I liked best:
For more images, credits and background information on the techniques used see:
The event is a real exercise in hurry up and wait. Races last just over 2 minutes but in reality you only have about 30 seconds of good shooting depending on your location. Then there is a pause while the next race sets up. Personally I couldn’t do it without my iPod and a selection of good pod casts.
I attended yesterday with the intention of working on my impressionist photography portfolio including dragged shutter and multiple exposure technique. I also thought I would try a little infra red black and white. All in all I was happy with my images. Here’s what I learned.
Shooting Location
The action takes place on the Long Pond at Centre Island. Races run from west to east.
You are much closer to the action if you perch on the south shore but be aware that at that location you are shooting into the sun.
Lenses
I brought a 70-200 and a 500 mm lens and a FX camera. My infrared camera is a DX. The 500 was marginally okay for shots looking directly down the course. The 70-200 was great for passing shots. If I had a 300 mm I would likely have used it.
Other Equipment
Wheels! It’s a long walk from the ferry so a wheeled camera bag is a great idea.
Tripod vs mono pod. I would bring both. The boats move quite quickly and there is a lot of action to choose from so I regretted not bringing a mono pod. The tripod of course is must at 500 mm as is a remote trigger.
Neutral density filters. You can’t slow down your shutter without them. I have been using a variable ND filter which I really like. The draw back being you can’t use a lens hood.
Food and water. There are lots of concession stands but the races run every 7 minutes on average so buying food will cost you 2-3 photo opportunities. I used a cooler bag and half frozen water bottles to keep it cold at a minimum weight.
Technique
To further my impressionist photography project I tried various shutter speeds and shutter intervals. It’s hard to tell at this point what worked and what didn’t but I will post my results as I see them. But on a preliminary basis it seemed to me that multiple exposures worked best at slower speeds eg 60th and dragged shuttled seemed best at about 1/2 a second.