
-
-
-
|
|
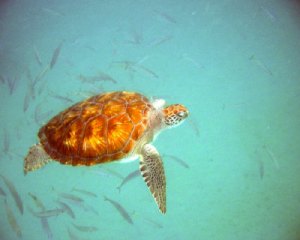 These pictures were taken while snorkeling in Barbados. The striking colour results from the basic colour These pictures were taken while snorkeling in Barbados. The striking colour results from the basic colour
balance techniques set out below. |
|
general
observations
My first experience with underwater photography began in 2004; a snorkeling trip in Barbados. The results were so encouraging that I decided to get my diver certification and make underwater photography a regular part of my travel plans. I have learned a lot since my first efforts. Here are some thoughts:
- First and foremost, underwater photography is all about underwater diving skill. I can’t emphasize that enough. If good photographs are a product of your ability to pre-visualize and effectively use point of view, then the underwater challenge is to develop enough control that you can realize your point of view on demand. That means learning the ins and outs of buoyancy. PADI offers great courses in underwater photography and buoyancy as part of their diver certification program. I highly recommend them.
 This picture, taken in the Grand Cayman Islands, works because the point of view is level with the stingray’s eyes. I generally over weight just a little to help get low when I need to although my profile generally has me well off the bottom to help spot opportunities. This picture, taken in the Grand Cayman Islands, works because the point of view is level with the stingray’s eyes. I generally over weight just a little to help get low when I need to although my profile generally has me well off the bottom to help spot opportunities.
- Second, I think digital cameras are an obvious choice for underwater photographs. Many inexpensive models now offer underwater housings as an accessory. More importantly digital cameras usually offer you a bright LCD screen as an alternative to a view finder. The LCD viewfinder makes composition easy underwater. Even more important, digital images are easily imported into Photoshop where the image can be manipulated to restore the reds that are naturally absorbed by the water (which is why everything looks blue). Below I have set out a simple technique for restoring the reds.
- When considering a digital camera for underwater photography there are a couple of considerations. Make sure the camera is capable of shooting in Raw Format. Manipulating images in Raw Format consistently produces better images. After that, the usual considerations related to image quality and resolution apply. I think digital SLR’s are the best choice because of the reduced shutter lag. If your camera maker does not sell an accessory underwater housing, then consider specialty manufacturers such as Ikelite. In my experience, Canon has the widest choice of digital cameras with accessory underwater housing. They deserve a good look. Here are some camera tips to consider before sealing the camera into its housing:
- change your settings so that the LCD is on maximum brightness and stays on as long as possible.
- turn off your power saving features. Your dive will only last 40 minutes and you don’t want to have to worry about turning the camera on during the dive.
- make sure you are shooting raw or at least at your highest resolution if raw is not available.
- use the biggest card you can afford and check your card before you get into the water to make sure you have lots of room. You can’t change cards underwater.
- check your batteries. You can’t change them underwater.
- then check and re-check the seals. A wet digital camera is a dead digital camera.
- If you can afford to, work in Photoshop. Photoshop Elements, is a good second best and the techniques here work in Photoshop Elements 4. But nothing can really touch the full package.
|
|
|
|
how to colour balance a shark
|
|
|
|
1. shoot RAW – balance and crop
(Note: I have learned a lot since writing the sections below and will post a substantial revision)
 In my experience, a good underwater photograph starts with a well composed and exposed picture. After that, basic Photoshop techniques apply to produce an image that is pleasing to the eye and provides the viewer with an accurate representation of your underwater experience. Notice the example to left is reasonably well exposed as evidenced by the histogram. It covers most of the graphs from black (left) to white (right) However, there is a blue monotone cast. I like to start with a raw image so that I can make adjustments to the shadows and exposure in order to ensure the image occupies the full range of the histogram without obvious clipping. I would also consider cropping at this stage. In my work flow I start in Adobe lightroom where I crop and make minor exposure adjustments. Adobe Camera Raw is another good choice as a starting point. In my experience, a good underwater photograph starts with a well composed and exposed picture. After that, basic Photoshop techniques apply to produce an image that is pleasing to the eye and provides the viewer with an accurate representation of your underwater experience. Notice the example to left is reasonably well exposed as evidenced by the histogram. It covers most of the graphs from black (left) to white (right) However, there is a blue monotone cast. I like to start with a raw image so that I can make adjustments to the shadows and exposure in order to ensure the image occupies the full range of the histogram without obvious clipping. I would also consider cropping at this stage. In my work flow I start in Adobe lightroom where I crop and make minor exposure adjustments. Adobe Camera Raw is another good choice as a starting point.
|
|
2. create a duplicate layer and sharpen.
 (Note to reader. I’m not sure what I was thinking when I wrote this but of course you sharpen last! Watch for the Photoshop CC update) As a first step, consider sharpening the image first. I use the NIC sharpening filter because it is easy to apply and provides consistent results. The out of the box sharpening filter found in Photoshop is also quite good. I often find myself using a layer mask when I sharpen in order to provide some emphasis on the subject matter. In this case I have sharpened the sharks outline as can be seen on the mask. (Note to reader. I’m not sure what I was thinking when I wrote this but of course you sharpen last! Watch for the Photoshop CC update) As a first step, consider sharpening the image first. I use the NIC sharpening filter because it is easy to apply and provides consistent results. The out of the box sharpening filter found in Photoshop is also quite good. I often find myself using a layer mask when I sharpen in order to provide some emphasis on the subject matter. In this case I have sharpened the sharks outline as can be seen on the mask.
|
|
|
|
3. create a new duplicate layer and run the filter or action.
 There are a couple of free actions available on Adobe’s There are a couple of free actions available on Adobe’s
Exchange site which have been designed to restore the reds in underwater photographs. I have tried them and they are quite good. Better yet, they are free. Look for free actions written by James Connell and Denny Tang. (From the Adobe Exchange site search
“underwater”.) My preference however is a filter/action combination available from Kodak’s Austin Development Center.
Digital ROC, when combined with Kodak’s Digital ROC Outland Action produces a wonderful, realistic restoration. As well, the filter comes with good controls allowing you to determine how much restoration you want to achieve. I often use the action. However, good results can be had using the filter on its own by setting the controls to minimum values.
4. Dodge, Burn and Mask.
 In order to improve the believability of the image, create a mask and only allow the foreground to show through as it would if you were using a flash underwater. In order to improve the believability of the image, create a mask and only allow the foreground to show through as it would if you were using a flash underwater.
|
|
|
Here is the result; just the way I remember seeing it.
|
|
resources
|
|
photography, photo impressionism and infrared black & white


